

If needed, user manuals can be downloaded from the article linked below in Related Pages.
To link (pair) the scanner to the base, use only the following instructions, which are from Page 10 of the scanner's QRG (Quick Reference Guide):
If the scanner exhibits strange behavior or will not send data after successfully completing the linking process, scan the following barcode to restore the scanner to factory default settings (from page 9) and Select USB Keyboard (from page 19):


==========================================================
WWS650 & WWS750: link scanner to base (comprehensive steps if there is trouble pairing):
1a. WWS650: The base station requires connecting the USB data cable from the base to the PC. There is no separate power supply needed.
1b. WWS750: The base station requires connecting the AC power cable (from the wall), and the USB data cable from the base to the PC.
2. Scan "Reset Default Settings" configuration barcode . There should be 2 short beeps, 4 short beeps, then 3 ascending beeps.
3. (If using the WWS750) Press and hold the button on the base (next to the LED lights) for more than 5 seconds, then release. The "RADIO" LED will blink rapidly, then change to a slower blink. Release the button after the slower blinks start.
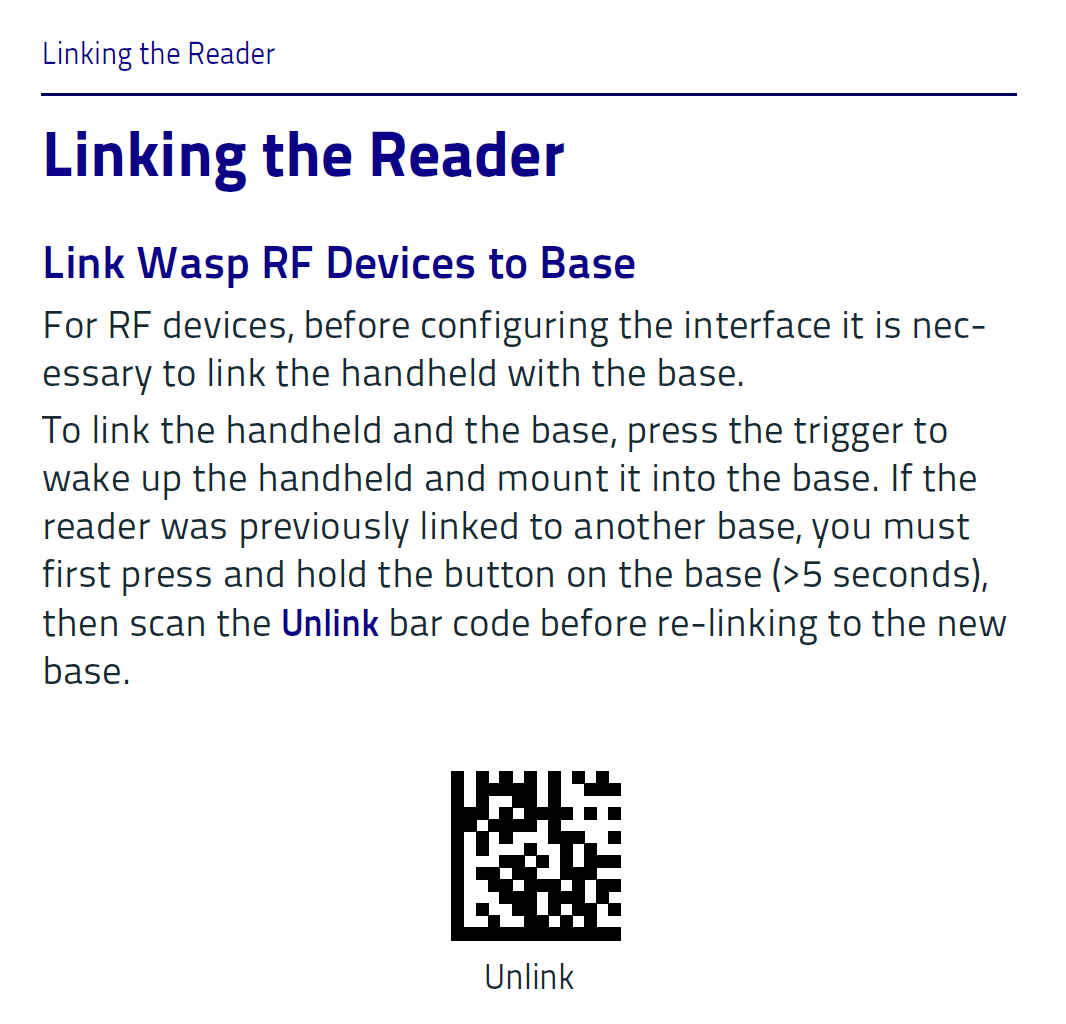
4. Scan "Unlink" configuration barcode (single beep).
5. Scan the Select USB Keyboard barcode. Wait for the beeps
6. Mount the scanner into the base. The "READER" LED will show red. The "RADIO" LED will blink briefly, and the scanner will give 3 ascending beeps.
The scanner should now be paired to the base. To test, run a program that accepts text input from a keyboard (such as Notepad or Word), then scan a data barcode (not a configuration barcode). The barcode's data should appear on the PC where the cursor was blinking.
***Note: If after performing the above process, the scanner is blinking green, or if it chirps but does not transmit data when scanned,
unlink the scanner then scan the "Select USB Keyboard" configuration barcode.