Note: This article is outdated. The current driver is v4.51; see Related Pages to download and use that version.
==========================================================
Download and extract the following file for the Windows print driver installer for receipt printers offered by Wasp:
This driver is compatible with Windows 10, Windows 8, Windows 7, Vista, and XP.
Windows 10: Start at Step 4 of the procedure below for first-time installations.
Windows 8: you may need to disable driver signing for this to install properly (see Related Content below).
Windows versions later than 7: Select Windows 7 for OS.Compatible printer model numbers include:
RP300H
RP330
RP200
WRP8055
WTP100
Note: You will need to complete additional steps if you experience strange behavior when printing to the receipt printer, such as:
- Clicking "Print Test Page" from the Printer Properties dialog causes multiple windows to close unexpectedly (even if the test page prints).
- Printing from QuickBooks Point of Sale (POS) works once (though output may be garbled), then QB says the printer is not found.
Steps (note: reboot is required)
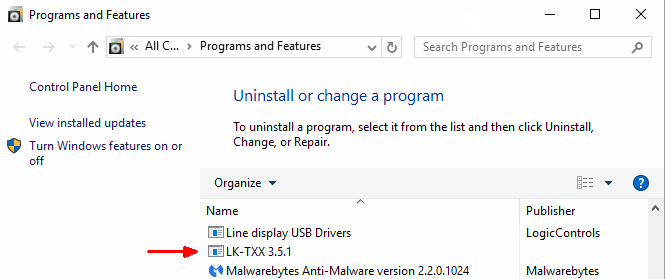
- Open the Programs and Features control panel (or Start, Run, appwiz.cpl)
- Find "LK-TXX 3.5.1" in the list, right-click, and Uninstall. If you get a message that the printer doesn't exist, do steps 6-8, then start this step again.

- At the end, uncheck "Rebooting" to prevent the PC from restarting. Complete the uninstaller.
- Unplug the printer's USB cable and leave it out for now.
- If needed, save documents and close applications, then reboot the PC.
- Run the "THERMAL PRINTER 3.5.1.exe" driver installer.
- In the OS Information Dialog, leave the Printer Port on LPT1. (If you change it to USB, the installer will fail and not install the driver, since the printer is not connected.)
- Finish the installation. At the end, uncheck "Rebooting" to prevent the PC from restarting.
- Open the Devices and Printers control panel.
- Plug in the printer's USB cable. After a moment, you should see POS PRINTER or LUKHAN PRINTER in the Unspecified section.
- Find VENDOR THERMAL PRINTER, right-click, then Printer Properties (both words).
- On the Ports tab, find the highest numbered USB### in the Port column, and check it. The correct port might not be the highest numbered one, but it shouldn't have any other printer assigned to it.
- Click Apply.
- On the General tab, click Print Test Page. A page should print. If not, go back to Step 12 and try a different USB### port.
- When you get a successful test page (and the windows remain open), the printer is installed properly.
- If using QuickBooks, configure the printer there, and try a test.
- If using QuickStore, click File menu, Printer Setup, Sales, and set or verify the printer. Click the Next button until the receipt printer shows on all the appropriate categories, then click OK (even if you don't change anything). If you have a cash drawer attached, click Setup menu, This Computer, 2. Cash Drawer, and set or verify the settings there, then click OK (even if you don't change anything). Make a test sale to confirm the printer prints and the cash drawer opens.

