Revised for Advanced Installer
App Version 2.01.00
Note: For earlier versions use the prior instructions (Linked in related content).
Introduction
This article describes the process to move the databases for AssetCloud On-Premise or InventoryCloud On-Premise to another PC. For instance, to move the database to a different server after an Express install.
The destination SQL server version must be the same or higher than the starting SQL server version. (The Express installer uses Microsoft SQL Server 2017 Express version 14.0.1000.169.) This is a characteristic of SQL Server, not a Wasp restriction.
Abbreviations used in the article:
| OP | The On-Premise software we're working with (AssetCloud or InventoryCloud). |
| STARTPC | Name of the computer where OP is installed, the current location of the databases. |
| DESTPC | Name of the computer where the databases will end up. |
| SSMS | SQL Server Management Studio |
If needed, there is an article "Cloud On-Premise: How to backup and restore the database" linked below in Related Pages (and also contains details on running SSMS).
Procedure
1. On STARTPC, use SSMS to create backups of the WaspAuth, WaspConfig, and WaspTrack databases. By default the backup files get saved to this path:
%ProgramFiles%\Microsoft SQL Server\MSSQL14.WASPDATA\MSSQL\Backup
2. On DESTPC, install SQL Server and SSMS if these are not already installed.
When installing SQL Server, be sure to enable SQL Browser and mixed authentication. Naming the instance WASPDATA is not required, but is recommended.
The collation must be "SQL_Latin1_General_CP1_CI_AS".
3. Transfer the backup files from STARTPC (using network, thumb drive, etc.) to the corresponding Backup folder on DESTPC. The path will likely be slightly different based on the SQL version and instance name, but it should be similar.
4. On the DESTPC, check that the SQL instance has TCP/IP enabled with port 1433.
Use the SQL Configuration Manager for your SQL version (e.g. SQLServerManager15.msc)
a) Navigate to "Protocols for WASPDATA" (your instance may vary).
b) Enable TCP/IP.
c) Right click TCP/IP and select Properties.
d) Go to the IP Addresses tab.
e) Under IPALL set the TCP Port to 1433.
You will need to restart the SQL Server (instance) after this change. The program should remind you to do this when applying changes.
5. Enable the TCP/IP port 1433 on the DESTPC firewall. Also allow the port on the STARTPC.
6. On DESTPC, use SSMS to restore the WaspAuth, WaspConfig, and WaspTrack databases.
7. On the STARTPC, use IIS Manager to stop the websites for WaspSTS, WaspAPI and Wasp_AC or Wasp_IC.
8. Still in IIS, recycle the application pools for the Wasp sites.
9. On the STARTPC, use services.msc to adjust both Wasp Later and Wasp Now services:
a) Manual start.
b) All three recover modes to "Take no action."
c) Stop the services.
10. On the STARTPC, start the configuration tool while holding down the shift key. The shift key tells the config tool to re-query for the database connection.
If you're logged in as the user that installed OP, there should be a desktop shortcut called "WASP ConfigurationTool". Otherwise here's the full path:
%ProgramFiles%\Wasp Barcode Technologies\Wasp On-Premises Software\License\configure\Wasp.Installer.Configure.exe
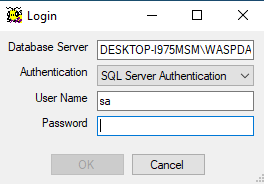
a) Enter the new information for the DESTPC SQL instance.
b) Enter the user name and password.
Note: We refer to sa for convenience. Your database administrator may have created a different SQL admin username for you.
c) Click OK.
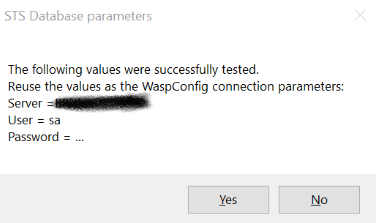
d) If the values changed, you will be prompted to save the new settings.

e) Click yes to save the new SQL connection data.
11. While in the config tool, verify the Data Source has been updated on the SQL Server tab. Use the Validate button to confirm.
Click Save, then exit the configuration tool.
12. On the STARTPC, flush REDIS:
a) Open an administrative command prompt.
b) Enter the following command:
cd "%ProgramFiles%\Redis-3.0.504-64bit"
c) You will need your REDIS password. The default is r3dIkul00zSVmVs, but you may be using a different password. You will find this in WaspConfig.RedisServerPassword.conf. You will need your REDIS port. It is probably 6379. You will find the value in WaspConfig.RedisServerPort.conf
d) Run the following command using your values for port and password
redis-cli -h 127.0.0.1 -p <port> -a <password> flushall
13. On the STARTPC, use SSMS to connect to the SQL instance on DESTPC. If there is a problem connecting, review step 4. You must resolve any connection problem before proceeding.
14. Still on the STARTPC, return to IIS and restart the WaspSTS, WaspAuth and appropriate OP site (Wasp_AC or Wasp_IC).
Browse the sites to make sure they come up correctly.
At this point you should be able to log in to OP. If you do not get the login screen, or get an error on one of the other sites, review the bindings and other settings for the three sites.
Also make sure you performed step 10 through 12 successfully.
15. On the STARTPC, restore the WaspNow and WaspLater service settings.
a) Start should be Automatic (delayed).
b) All three recovery options should be "Restart service" with the restart time set to 0 (zero).
c) Click Apply, then
d) Start each service.
16. You may now carefully remove the SQL server on the STARTPC.
In Programs and Features (appwiz.cpl), you may uninstall "Microsoft SQL Server 2017 (64-bit)".
Do not remove the SQL Compact installs. These are used by Wasp.
We recommend that you leave SSMS installed on STARTPC. It can be useful.
Uninstalling SQL will leave many files behind. A full tutorial on uninstalling SQL is beyond this document.

