

How to move Wasp AssetCloud/InventoryCloud On-Premise Off the System Drive
Introduction
Some customers require software to reside on a drive different that the system drive (C:\). This guide will assist you in that endeavor.
This guide may also be used for moving InventoryCloud, just adapt any mention of AC.
Read through the entire document to plan your move. You may decide to modify some procedures or want greater clarification.
It is better to ask questions up front than when you are in the middle of a move and the clock is ticking.
Components
- SQL — A knowledgebase article already exists on how to move SQL Server and the databases off the system drive.
- Redis — Redis is an in-memory value store. Because it is primarily involved with volatile memory, moving it to another drive has no value except to comply with organization mandates.
- RabbitMQ — The message queue along with the Erlang language it is written in may be moved to another drive.
- Web Services
Note that web services consumes some space on the system drive in the Users folder.- WaspSTS — Authentication service
- WaspAPI — Web.mobileasset.com API service
- WASP_AC — AssetCloud (called WaspMVC in older versions)
- Now Service — A windows service.
- Later Service — A windows service.
- Configuration Tool
Note that the logs for the configuration tool will always write to %ProgramData%. There is currently no way to stop this.
Methods of Moving
There are various scenarios you may face as you contemplate moving Wasp AC off the system drive.
Moving Version 2.0 or Newer
This is the typical moving scenario.
New Advanced Installation
Unfortunately, specifying an alternate location did not make it into the On-Premise Advanced Installer. Therefore, install and follow the instructions for moving version 2.0 to an alternate drive.
Upgrading and Moving
Current recommendation is to upgrade in place, then move using the version 2.0 or later instructions.
Moving Version 1.4 or 1.5
Old version should be upgraded before proceeding. Then move using the version 2.0 or later instructions.
Other Situation
In the event you have a situation not covered by the above methods, try to adapt the procedure for moving version 2.0 or newer.
If that won’t work, Wasp Technical Support may be able to assist in crafting a unique solution.
Conventions
Examples in this document will use drive C:\ as the system drive and drive E:\ as the destination drive. Your situation may vary.
Short File Names
Some of the tools used by Wasp AC, but not created by Wasp Barcode Technologies, have problems with long file names with spaces. Since these are not Wasp creations, we must work around the limitations.
It is safest to use DOS 8.3 short path names. However, some instances of Windows have 8.3 naming disabled.
Check Short Name Policy
The Dir /X command is supposed to show short names. Try it on the computer, preferably on the target drive. Here is an example of a working Dir /X:
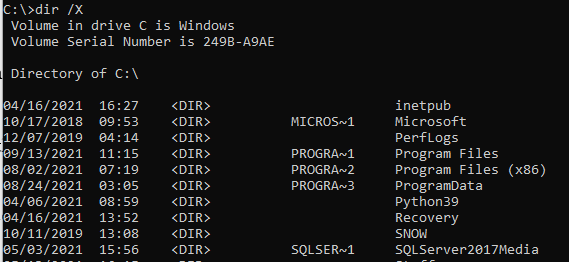
However, some versions of Windows will ignore the /X argument:
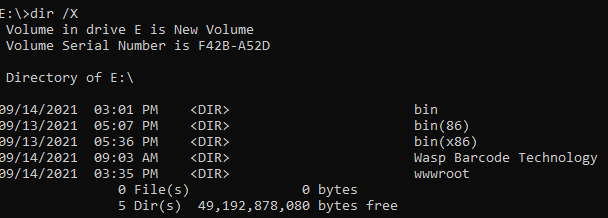
If this happens to you, the simplest solution is to not use spaces in the path. The other solution is to work with your IT professionals to change the “8dot3” name policy on the target machine or volume.
The “fsutil 8dot3Name” utility may be used if you are a local administrator and using an administrator command prompt. Policy may be set for a specific volume (drive) or for all volumes.

See https://docs.microsoft.com/en-us/windows-server/administration/windows-commands/fsutil-8dot3name for documentation.
Having enabled the policy is not enough. It does not create the 8.3 names on existing paths. You will need to create new directories to generate the short paths.
Doing this check early will save you grief later. But if you wind up with a problematic folder without a short name after enabling the policy:
- Rename the folder to add “.old” to the end.
- Manually create a new folder and give it the original name.
- Copy the contents from the old to the new folder.
- Delete the old folder.
Note you do not have to do rename the folders on the system drive you are leaving. It only becomes a problem as you move components to the new target drive.
Procedure: New Installation to Drive E:\
If you do not yet have Wasp AC installed, you could save some hassle by performing some installs before Wasp.
Preinstall SQL Server
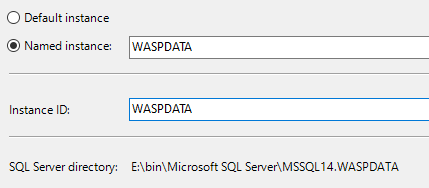
Install SQL server to the alternate drive. Wasp AC will be able to use this server, saving a great deal of effort. The preferred instance name is WASPDATA.
Install the product, specifying that Wasp should use your existing SQL.
Follow the steps for moving version 2.0 or newer.
Procedure: Moving Version 2.0 or Newer
Note that to remove as much as possible, it may be necessary to create some symbolic links to fool the system into thinking some parts are on the system drive.
Plan and Inform Users
Make sure the users are aware of downtime during the move. Plan for an entire day, although this should only take three hours.
Stop the websites
In IIS, stop the websites:
- Wasp_AC
- WaspAPI
- WaspSTS
Backup Everything. Seriously. Back It Up.
Think how bad you’ll feel if something goes terribly wrong and you don’t have known good backups.
- Backup the SQL databases and copy the backup files to a safe location.
- Backup Wasp Barcode folders in ProgramData and “Program Files”.
Make sure the backup SQL databases work to restore. You will need these later.
Modify the Service Definitions
The windows services used by Wasp AC are set to automatically restart. Changing this will prevent problems.
- Open “Services.msc”.
- Perform the following steps on services
RabbitMQ, Redis, WaspNowService and WaspLaterService:- Right click the service and select properties.
- Go to the Recovery tab.
- Change all three failure actions to “Take No Action”.
- Click OK to save the changes.
Stop Wasp Window Services
In the Services.msc, stop:
- WaspLaterService
- WaspNowService
To keep them off while we work (and reboot), open the properties of each and disable.
Update Windows
Make sure all updates have run for Microsoft Windows. We do not want an update interrupting us later.
Reboot as many times as it takes to have all updates applied.
Move SQL Server
See KB Article #1610. That article is primary. This is a secondary paraphrase of that information.
This process assumes your new SQL Server is on another machine. Moving a SQL instance from the system drive to E:\ is much harder.
Note that even with these procedures, some parts of SQL will reinstall to the system drive.
Note that the SQL collation must be "SQL_Latin1_General_CP1_CI_AS".
Recommendation: For performance reasons, run your SQL Server on a separate computer.
Prerequisites
- The destination SQL Server version must be the same or higher than the starting SQL server version.
- The destination SQL Server version must be SQL Server 2016 or newer for the current version of AssetCloud/InventoryCloud.
- Make sure you know where the backup data sets are for WaspAuth, WaspConfig and WaspTrack.
SQL On Same Machine
Not recommended. You will be better off using a separate SQL machine.
Uninstall SQL from the old location
You will have to uninstall SQL Server and remove the left behind stuff so it will cleanly install to an alternate drive.
- Copy your backups to a safe location. In this example we will later install to drive E:\, so here we copy to the root of E:\.
- Uninstall all the SQL Server pieces using “AppWiz.cpl”. Order matters in some cases. The exact list will vary by installation. While you may be able to get away with not removing (and then reinstalling) everything, it is easier than chasing bad links later.
- Microsoft SQL Server 2017 (64-bit)
- Refresh AppWiz.cpl, as uninstalling the above may have shortened the list.
- Microsoft SQL Server 2017 LocalDB
- Microsoft SQL Server Compact 3.5 SP2 x64 ENU
- Microsoft SQL Server Compact 3.5 SP2 ENU
- Microsoft SQL Server 2017 T-SQL Language Service
- Browser for SQL Server 2017
- Microsoft SQL Server 2017 Setup (English)
- Microsoft OLE DB Driver for SQL Server
- Microsoft ODBC Driver 17 for SQL Server
- Microsoft ODBC Driver 13 for SQL Server
- Microsoft VSS Writer for SQL Server 2017
- SQL Server Management Studio – 18.2
- Delete the SQL Server directories. Some of these should already be gone, but are included for completeness:
- %ProgramFiles%/Microsoft SQL Server Compact Edition
- %ProgramFiles%/Microsoft SQL Server
- %ProgramFiles(x86)%\Microsoft SQL Server
- %ProgramFiles(x86)%\Microsoft SQL Server Compact Edition
- %ProgramFiles(x86)%\Microsoft SQL Server Management Studio
- %AppData%\Microsoft SQL Server
- %AppData%\SQL Server Management Studio
- %LocalAppData%\SQL Server Management Studio
- In the Windows Registry, clean out
- HKEY_CURRENT_USER\SOFTWARE\Microsoft\SQL Server Management Studio
- HKEY_LOCAL_MACHINE\SOFTWARE\Microsoft\Microsoft ODBC Driver 17 for SQL Server
- HKEY_LOCAL_MACHINE\SOFTWARE\Microsoft\Microsoft SQL Server
- HKEY_LOCAL_MACHINE\SOFTWARE\Microsoft\Microsoft SQL Server 2017 RC0 Redist
- HKEY_LOCAL_MACHINE\SOFTWARE\WOW6432Node\Microsoft\Microsoft ODBC Driver 17 for SQL Server
- HKEY_LOCAL_MACHINE\SOFTWARE\WOW6432Node\Microsoft\Microsoft SQL Server
- Reboot.
Install SQL
In this (not recommended) example, we install SQL to the E:\ drive. Installing SQL is beyond the scope of this document. Consult your IT professionals.
Make sure SQL collation is "SQL_Latin1_General_CP1_CI_AS".
Install SqlExpress (SQL Server 2017) to E:\

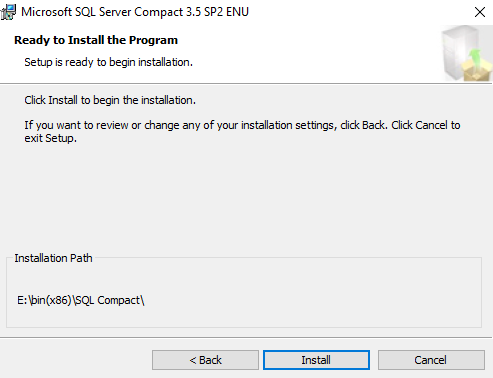
Install SQL Compact 86
SQL Compact requires both x86 and 64-bit version to function.
To install SQL Compact 86 on E:\ we must run the MSI file from the command line. Note the 32-bit folder.

The installation UI from Microsoft won’t let you change the install path.
Install SQL Compact 64
Install 64-bit SQL Compact to E:\. Both x86 and 64-bit versions are required. Again, this must be from the command line.

Install SQL Management Studio (SSMS) to E:\.
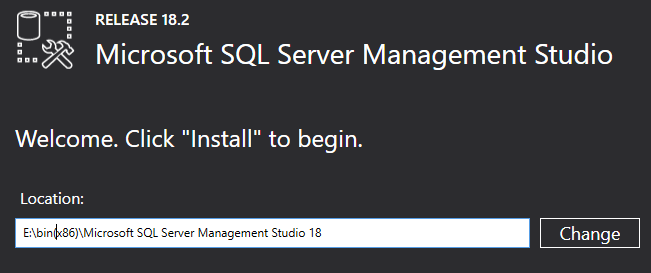
Reboot after installing SSMS.
Note that the databases are not created yet. That will occur later.
Touch up SQL Connection Information
- Using your own values for folders, SQL instance, SQL admin username and password, construct a connection string in the following form. If you are using the default SQL instance, leave off the backslash and do not specify an instance name. We will be using this momentarily.
server=DESKTOP-I975MSM\WASPDATA;Database=WaspConfig;User=sa;Password=MyS3cretP@sswd;MultipleActiveResultSets=true;Connection Timeout=7 - Open the Registry Editor (regedit) and navigate to the path:
HKEY_LOCAL_MACHINE\SOFTWARE\Wasp Barcode Technologies\Cloud - Locate the value ConfigurationValueConnection. This value is encoded, so will appear as a nonsense string of characters.
- Edit the value. Paste in the connection string you built.
- Click OK to save. The string is no longer encoded. That will happen the next time AC is started.
Move Wasp Folder from ProgramData
- Move the folder “%ProgramData%\Wasp Barcode Technologies\MobileAssetWeb” to the SQL machine/alternate drive.
- If you copied the folder, go ahead and delete the old one.
- If there is an OnPremiseInstallation.log file in %ProgradData%, you may delete it.
Notes
- You do not need to copy the log folder. It will probably be very large. It is OK to just delete the log folder.
- In this example, the destination is “E:\Wasp Barcode Technologies\MobileAssetWeb”.
- You'll need to show hidden folders to be able to see ProgramData.
- If they're not already present, you will need to create the "Wasp Barcode Technologies" and "MobileAssetWeb" folders before pasting the folders in.
- Many tools may still point to %ProgramData%. If you can leave this folder alone, life will be simpler.
Change Paths for SQL tools
We will need to edit a configuration file to override %ProgamData%.
- Navigate to E:\Wasp Barcode Technologies\MobileAssetWeb\Database\Tools.
- Edit the file CreateNewDatabases.config.
- Locate and change paths with “%ProgramData%” to “E:”.
- Save and close the file.
- Edit SqlScriptRunner.exe.config.
- Locate and change paths with “%ProgramData%” to “E:”.
- Save and close the file.
Database Setup
Note about Wasp SQL tools
The tools and scripts used in setting up SQL require space on %ProgramData%.
Restore the Databases
- If the SQL Server is a different computer, transfer the database backup files to the destination machine.
- Copy the backup files to the SQL backup location on the alternate drive. In this example that is
E:\bin\Microsoft SQL Server\MSSQL14.WASPDATA\MSSQL\Backup - Restore the three databases from the backup files using SSMS (in administrator mode).
- Make sure that SQL Security has logins for dbo_Reader and dbo_Writer.
Adjust the Wasp DB Settings
- Run the "WASP ConfigurationTool". There should be a desktop shortcut. If not, the path should (still) be
%ProgramFiles%\Wasp Barcode Technologies\Wasp On-Premises Software\License\configure\Wasp.Installer.Configure.exe - Set the Database Server field to DESTPC\INSTANCE (or just DESTPC)
The SQL Server tab should now have the correct values. We will adjust the other tabs later. - Exit the configuration tool
Move Redis
Stop and Copy Redis
- In the Services.msc, stop Redis.
- Check the AppWiz.cpl application to double check there is no entry for Redis. If there is, you had a prior Redis install and should consult with your IT team about moving the service. If there is no entry, proceed.
- Copy the Redis folder to the alternate drive. In this example,
%ProgramFiles%\Redis-3.0.504-064bit to E:\bin\Redis-3.0.504-064bit. - Open a Command prompt in administrator mode.
- Navigate to the new Redis folder

- Unregister the Redis service

Register Redis at New Location
- In the same administrator command prompt, enter
redis-server --service-install "E:\bin\Redis-3.0.504-64bit\redis.windows-service.conf" - Refresh the Services.msc and open the properties for the Redis service.
- The path to executable should now be in the new folder.
- On the “Log On” tab, the “This account” option should be selected with “Network Service” as the account and the regular Redis password.
- The service description will be empty. If you wish, you may set the service description text to your liking:
SC description redis "This service runs the Redis server"
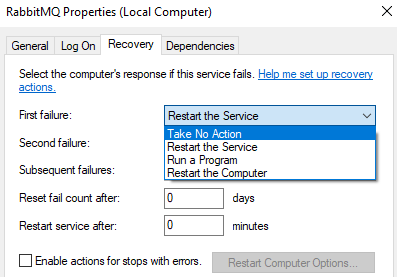
Restore the Redis Recovery Options
- In Services.msc, open the properties for Redis and change to the Recovery tab.
- Change all three failure modes to “Restart the Service”.
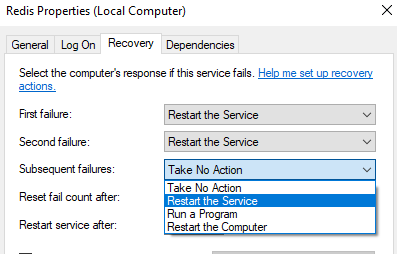
- Change the “Restart service after” value to 0 (zero) minutes.

Delete the Old Redis Folder
You may now delete the old folder %ProgramFiles%\Redis-3.0.504-64bit.
Flush Redis Cache
Having moved Redis, we can no longer trust the values it has stored.
- Open an administrator command prompt and navigate to the Redis folder (E:\bin\Redis-3.0.504-64bit).
- Enter: redis-cli -h 127.0.0.1 -p 6379 -a <your redis password> flushall
Note that you may find your Redis password in the file WaspConfig.RedisServerPassword.conf and your Redis port in the file WaspConfig.RedisServerPort.conf.
Move RabbitMQ
Message queue handling uses RabbitMQ, MNESIA (“amnesia”) databases, plug-ins and runtimes. RabbitMQ is dependent on Erlang.
Note that if you have requirements to update your version of RabbitMQ, Erlang, or the JQuery they use, this would be a good opportunity. In that case you would follow the Knowledgebase article for updating JQuery/RabbitMQ/Erlang rather than this move procedure.
There are many environment variables used. You will be changing these soon. Familiarity with either “setx /M” or the environment variable setting dialog is assumed. Among the quick ways to the System Properties dialog (gateway to the environment variable screen) is to set up a shortcut to “control.exe sysdm.cpl,System,2”. As long as the environment variables get set, use whatever method you prefer.
Stop RabbitMQ
- Open a command promp in administrator mode.
- Enter: pushd %RABBITMQ_SERVER%\sbin
- Enter: rabbitmq-service stop
If you check the Services.msc (and refresh if you already had it running), you’ll see RabbitMQ has stopped. - Stop then Erlang component of RabbitMQ named epmd.exe.
- Discover the location of epmd.
- Open task manager
- Switch to the Details tab.
- Sort by name, then find epmd.exe.
- Right click on epmd.exe, select properties.
- Location will give you a path. Copy the path. In this example, the path is "C:\Program Files\erl10.2\erts-10.2\bin".
- In an administrator command prompt, enter
pushd "C:\Program Files\erl10.2\erts-10.2\bin" - Enter: epmd -kill
- Return to the prior RabbitMQ folder: popd
- Discover the location of epmd.
- You should be back in the sbin folder of RabbitMQ.
Enter: rabbitmq-service remove - Refresh services.msc. The RabbitMQ entry should be gone.
- Close the command prompt so it isn’t locking folders.
- Locate the .erlang.cookie files and delete them. They will be in
- %UserProfile%
- %WinDir%\System32\config\systemprofile
Note: Because of Windows security, you will have to navigate one folder at a time, giving permission each step of the way.
Remaining Movement of Files
Uninstall Erlang
Because Erlange makes an entry in Add Remove Programs, we have to uninstall it in order to move.
Bring up AppWiz.cpl and uninstall erl10.2 (may be named differently on your system).
Unregister the Wasp Services
- In an administrator command prompt,
enter: sc delete WaspLaterService - Enter: sc delete WaspNowService
- Close the command prompt.
Move Remaining Wasp Folders
We’ve already moved one Wasp folder, now on to the rest.
- Copy the folder %ProgramFiles%\RabbitMQ to the alternate drive, in this example, E:\bin\RabbitMQ.
- Copy the Erlang folder (in this example) %ProgramFiles%\erl10.2 to the alternate drive (E:\bin\erl10.2)
- Delete the old Erlang folder.
- Delete the old RabbitMQ folder.
- Move (either cut/paste or copy/delete old) folder “%ProgramFiles%\Wasp Barcode Technologies” to the alternate drive,. In this example, we copy to “E:\bin\Wasp Barcode Technologies”.
- Move (either cut/paste or copy/delete old) web site folders from the system drive to the alternate.
- Create a web root folder such as E:\wwwroot
- Move C:\inetpub\wwwroot folders for Wasp_AC, WaspAPI and WaspSTS to E:\wwwroot.
- Copy %AppData%\RabbitMQ\db to the new RabbitMQ location (E:\bin\RabbitMQ\db).
- Copy %AppData%\RabbitMQ\log to the target drive (E:\bin\RabbitMQ\log).
- Copy the file %AppData%\RabbitMQ\enabled_plugins to the target RabbitMQ folder (E:\bin\RabbitMQ\enabled_plugins).
- You may now delete the %AppData%\RabbitMQ folder.
File rabbitmq.conf
Because we are moving RabbitMQ away from the default location, we must make sure there is a rabbitmq.conf file. We must create the file if it does not already exist.
Create a (trivial) rabbitmq.conf with a cmd.exe command such as:echo # end: rabbit mq config file >> "E:\bin\RabbitMQ\db\rabbitmq.conf"
If the file already exists, move it to the db location.
Update the Shortcuts
Wasp Configuration Shortcut
- Edit the shortcut for Wasp Configuration with the new path. In this example we just replace the first bit to get:
"E:\bin\Wasp Barcode Technologies\Wasp On-Premises Software\License\configure\Wasp.Installer.Configure.exe" - Change the icon path for the configuration shortcut. In the shortcut properties, go to the Shortcut tab.
- Click “Change Icon…”
- Browse to “E:\bin\Wasp Barcode Technologies\Wasp On-Premises Software\Sources” (in this example).
- Select WaspBarcode_Black_WhiteBckGrd48x48.ico and select OK.
Wasp AC Shortcut
Change the icon path for the Wasp AssetCloud shortcut. In this case the “Change Icon…” button is on the “Web Document” tab of the shortcut properties.
Optional Other Shortcuts
Changes to the Getting Started and Welcome shortcuts are optional. The icon change process is the same as for Wasp AC.
Update the path in the shortcut for Wasp_OnPremise_Welcome_Page. In this example:
file:///E:\bin\Wasp Barcode Technologies\Wasp On-Premises Software\License\Welcome\Welcome.html
Update Environment Variables
Use your favorite method for updating environment variables. Some people like “setx /M”, others like the old environment variable dialog.
Remember to close any command prompts when you are done so the values will be updated.
RabbitMQ Environment Variables
Reminder About Short File Names
If you followed the advice at the beginning of this document, you should not have a problem getting the short 8.3 names.
We will be using Dir /X to get short path names to use while setting up RabbitMQ.
If you run into a problem with your system not showing 8.3 names, see section 1.4, “Short File Names”.
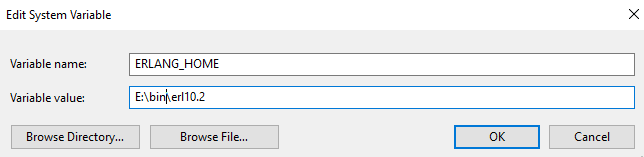
ERLANG_HOME
- Obtain the short file path to the new erlang location. You can use Dir /X to get the short name, but here we avoided the problem by using “E:\bin\erl10.2”. Using the short 8.3 path for this variable is critical.
- Update the ERLANG_HOME environment variable to this value.
RABBITMQ_SERVER
Update the RABBITMQ_SERVER variable to the new location. In this example: “E:\bin\RabbitMQ\rabbitmq_server-3.7.17”
RABBITMQ_HOME
This system environment variable is likely not already defined. This is because we were using the default %AppData% location. Now that we are using an alternative location, we must create new variables. Create it with the same value as RABBITMQ_SERVER.
RABBITMQ_PLUGINS_DIR
This new system variable must be created because we no longer use the default location. In this example it is set to:
E:\bin\RabbitMQ\rabbitmq_server-3.7.17\plugins
RABBITMQ_LOG_BASE
This new system variable must be created because we no longer use the default location. In this example it is set to:
E:\bin\RabbitMQ\log
RABBITMQ_BASE
This new system variable must be created because we no longer use the default location. In this example it is set to:
E:\bin\RabbitMQ\db
RABBITMQ_CONFIG_FILE
Earlier we created (or moved) the rabbitmq.conf file. Set the path to the file in the system environment variable RABBITMQ_CONFIG_FILE.
Example: E:\bin\RabbitMQ\db\rabbitmq.conf
RABBITMQ_MNESIA_BASE
This new system variable must be created because we no longer use the default location. The pre-existing name of this folder will be based on your specific installation.
Look in the folder you set as RABBITMQ_BASE (E:\bin\RabbitMQ\db)
There should be an existing folder that has your machine name and “mnesia”.
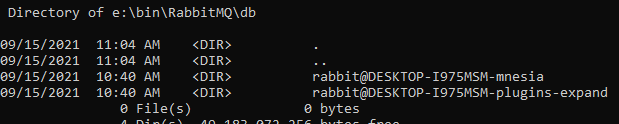
In this example, the path is (E:\bin\RabbitMQ\db\rabbit@DESKTOP-I975MSM-mnesia). Yours will be different.
Set a system environment variable named RABBITMQ_MNESIA_BASE to this path.
RABBITMQ_MNESIA_DIR
This new system variable must be created because we no longer use the default location.
Set RABBITMQ_MNESIA_DIR to the same value as RABBITMQ_MNSEIA_BASE.
In this example: E:\bin\RabbitMQ\db\rabbit@DESKTOP-I975MSM-mnesia
RABBITMQ_PLUGINS_EXPAND_DIR
This new system variable must be created because we no longer use the default location.
In the RABBITMQ_BASE folder you should find the folder we want for the RABBITMQ_PLUGINS_EXPAND_DIR variable.
In this example: E:\bin\RabbitMQ\db\rabbit@DESKTOP-I975MSM-plugins-expand
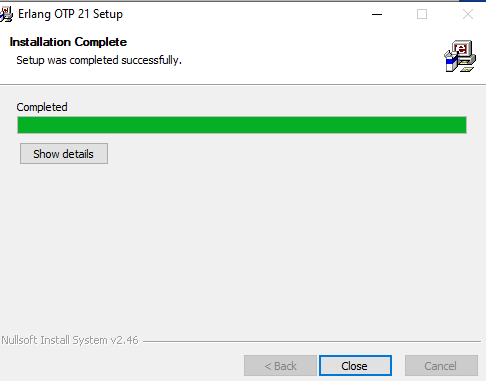
Reinstall Erlang
With the environment variables set, we are ready to reinstall Erlang using the new location.
Navigate to the Wasp folder you copied earlier from %ProgramFiles%. Continue navigating down to the Erlang_Rabbit folder.
In this example: “E:\bin\Wasp Barcode Technologies\Wasp On-Premises Software\Erlang_Rabbit”.
Run otp_win64-21.2.exe as an administrator. Note that the version may be newer, with a corresponding installer name.
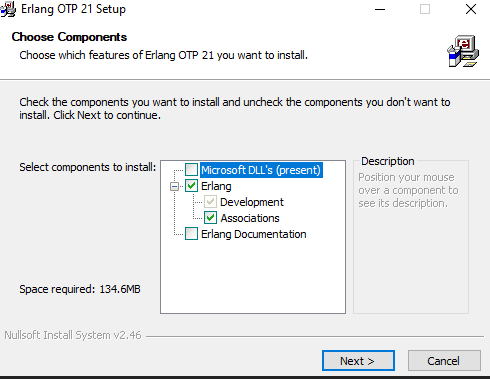
The correct options should already be selected. Click Next.
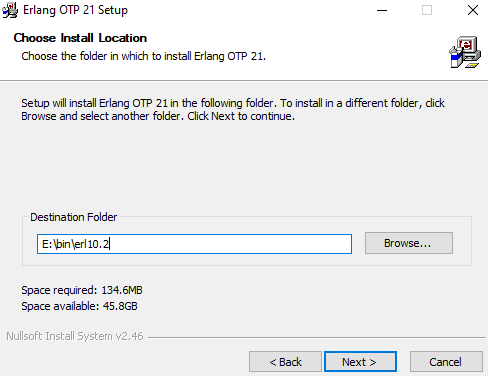
Enter the folder. In this example, that is E:\bin\erl10.2. Click Next.
Check “Do not create shortcuts”. Click Install.
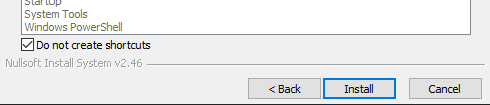
Upon successful completion, click Close.
Setup RabbitMQ Service
We will now get the RabbitMQ Windows service running from the new location.
Reinstall RabbitMQ
- Open an administrator command prompt and navigate to “%RABBITMQ_HOME%\sbin”. For the example, this is:
E:\bin\RabbitMQ\rabbitmq_server-3.7.17\sbin - Enter: rabbitmq-service.bat install
This will pop two Security Alerts requests. - Check both private and public boxes as Erlang likes to use the loopback address.
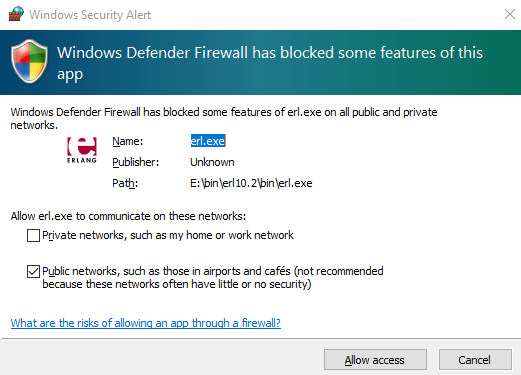
Note: The screen shot should show both boxes checked. - OK both security alerts.
- Refresh Services.msc and locate RabbitMQ.
- Open the properties for the RabbitMQ. Switch to the Recovery tab.
- Set all three failure modes to “Restart the Service”.
- Set the “Restart service after:” value to 0 (zero) minutes.
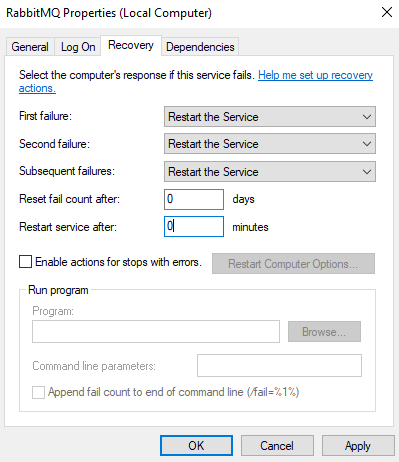
- OK your changes.
Rabbit Plugins and Service Start
Return to the administrator command prompt that should still be in the sbin folder.
- Enter: rabbitmq-plugins.bat enable rabbitmq_management
- Enter: rabbitmq-service.bat start
- In a browser (such as Edge, never IE), enter: http://127.0.0.1:15672/#/
- Log in to the RabbitMQ console as user guest, password guest.
Check the .erlang.cookie file
The .erlange.cookie file is something we cannot get off the system drive.
If the installation went smoothly, the identical file should be in the system profile folder and the user profile folder. Verify the date timestamp on the two files. If needed, copy the system profile version to the user profile.
- System Profile example: C:\Windows\System32\config\systemprofile
- User Profile example: %UserProfile%
Wasp Configuration for RabbitMQ
- Return to the administrator command prompt which should still be in the sbin folder
- Perform the following bat files. Ignore errors.
- wasp-configure-mq-server-00.bat
- wasp-configure-mq-server-01.bat
- wasp-configure-mq-server-02.bat
- wasp-configure-mq-server-03.bat
- wasp-configure-mq-server-04.bat
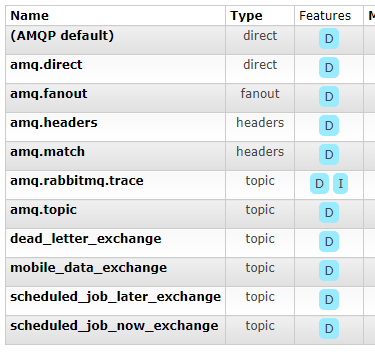
- Return to the browser with the RabbitMQ console. Because we moved a working RabbitMQ, the Exchanges, Queues and Admin values should be correct. Verify the entries.
- Once verified, you may close the browser.
RabbitMQ Exchanges
RabbitMQ Queues
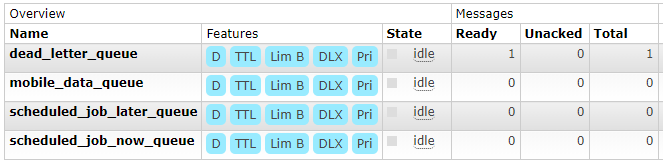
RabbitMQ Users
In addition to admin and guest:

Update Config Files
We will now update some configuration files. Note that you can shorten this process by using a tool that supports “Find/Replace in Files”, such as NotePad++. Just be careful to type your search and replacement values correctly. The table below illustrated the replacements used in this example.
| Old Config Value | Replacement Config Value |
|---|---|
| %ProgramFiles%\ | E:\bin\ |
| C:\Program Files\ | E:\bin\ |
| C:\inetpub\wwwroot\ | E:\wwwroot\ |
Restore the Wasp Now and Later Services
Unfortunately, the service installer bat and ps1 files have numerous references to the system drive. We will do this manually.
WaspNowService
- In an administrator command prompt navigate to the directory “E:\bin\Wasp Barcode Technologies\Wasp On-Premises Software”.
- Enter: pushd NowService
- Enter the following as a single line:
sc create WaspNowService binPath="E:\bin\Wasp Barcode Technologies\Wasp On-Premises Software\NowService\Wasp.MobileAsset.NotificationServicesWorker.exe" - Enter: sc description WaspNowService "Wasp Now Service"
- Refresh the services.msc and open the properties for the WaspNowService.
- Set Startup type to Automatic.
- Set all three failure actions to “Restart the Service”.
- Set the Restart service value to 0 minutes.
- OK the changes.
- Start the service.
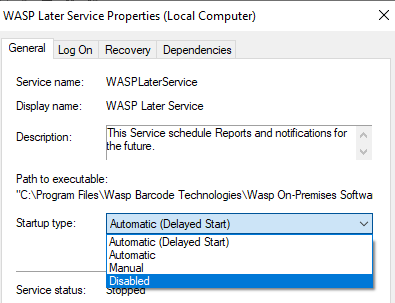
WaspLaterService
- In an administrator command prompt navigate to the directory “E:\bin\Wasp Barcode Technologies\Wasp On-Premises Software”.
- Enter: pushd LaterService
- Enter the following as a single line:
sc create WaspLaterService binPath="E:\bin\Wasp Barcode Technologies\Wasp On-Premises Software\LaterService\Wasp.NotificationSchedulerService.exe" - Enter: sc description WaspLaterService "Wasp Scheduler Service"
- Refresh the services.msc and open the properties for the WaspLaterService.
- Set Startup type to “Automatic (Delayed Start)”.
- Set all three failure actions to “Restart the Service”.
- Set the Restart service value to 0 minutes.
- OK the changes.
- Start the service.
Reconfigure Web Sites
Open IIS. You may have noticed that we never deleted the website definitions inside IIS. We are going to edit the existing sites.
- Click on WaspSTS to highlight it.
- Over on the right, in the Actions column, click “Basic Settings…”
- Change the “Physical path” to the new location.
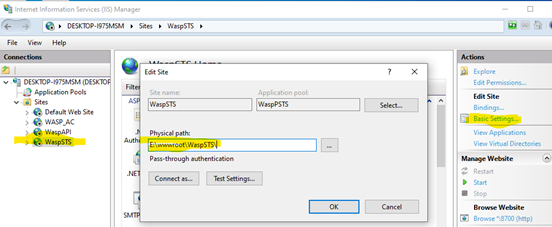
- Repeat for WaspAPI, and finally for Wasp_AC.
Start the System with Final Configuration
We are almost done! Bring up IIS.
SQL, RabbitMQ and Redis
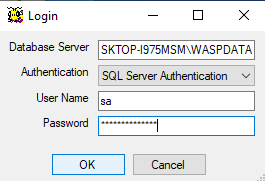
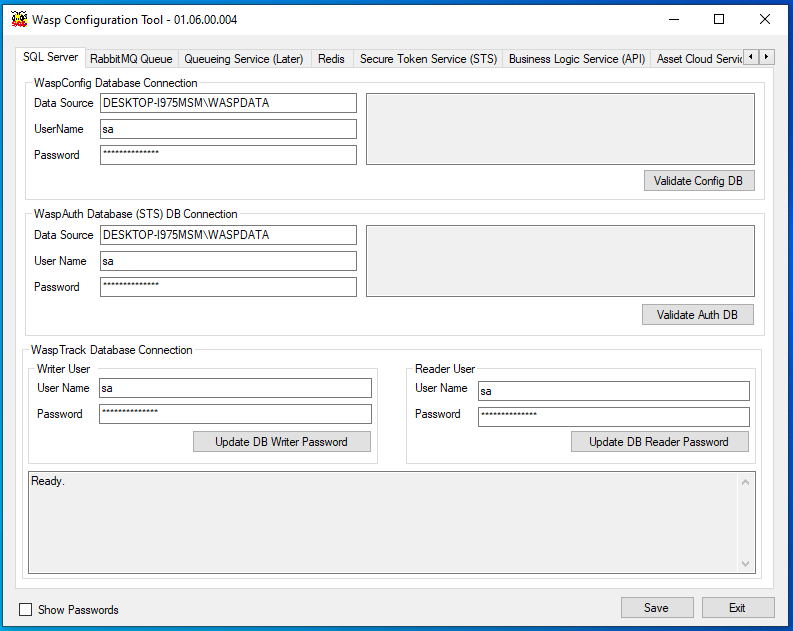
- Launch the Wasp Configuration Tool (one of the desktop shortcuts we fixed earlier). You will need to enter the user (sa) and the correct password.
- Validate SQL Server.
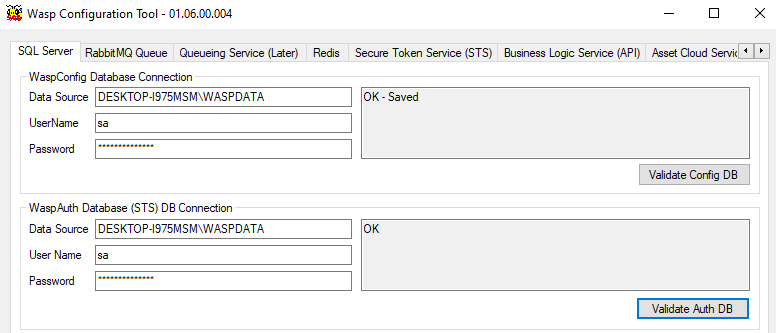
- Validate RabbitMQ Queue.
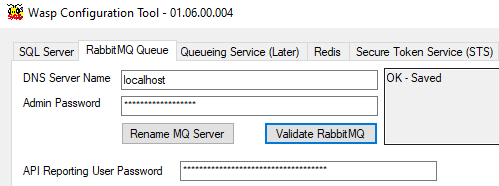
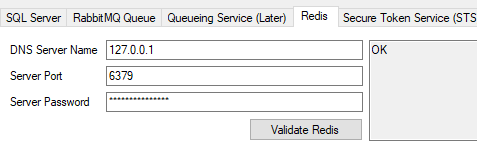
- On the Redis tab, enter the Server Password. You can get the password from the file WaspConfig.RedisServerPassword.conf.
- Validate Redis.
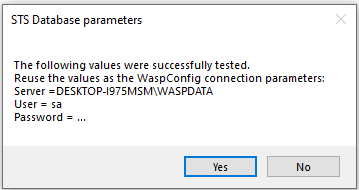
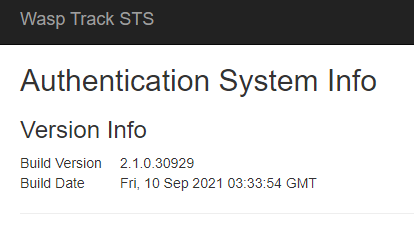
Wasp STS
- In IIS, start WaspSTS.
- Over in the IIS, browse to the STS web site. When it comes up, copy the URL and paste it into the DNS Server URL. Note that this may be your machine name, or it might be localhost. The two need to agree.
- If needed put in the correct Admin User Password.
- Validate STS
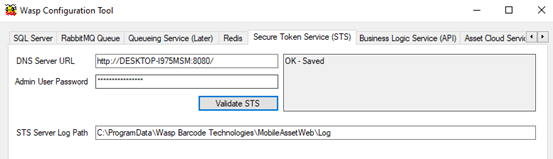
- Save and exit the configuration tool, then restart it.
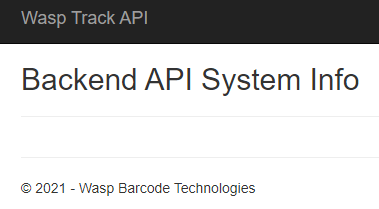
Wasp API
- In IIS, start the API service. Both STS and API are now running.
- Browse the API website.
- Copy the URL.
- In the configuration tool, switch to the Business Logic Service (API) tab.
- Paste the URL into the DNS Server Url field. This may be "http://localhost:8081/" instead of having the machine name. This is fine, as long as the browser URL and this field agree.
- Validate the API. Try again if it reports “a task was cancelled”.
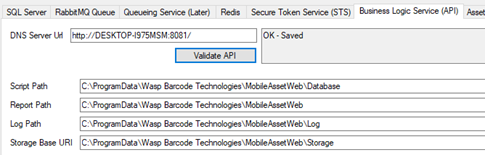
- Save and exit the configuration tool, then restart it.
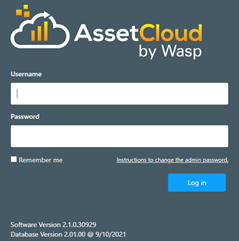
Wasp AC
- In IIS, start the WASP_AC service.
- Browse the website.
- Copy the URL (to the end of the port number).
- In the configuration tool, switch to the Asset Cloud Service (MVC) tab.
- Paste the URL into the Server URL field.
- Update the host field.
- Validate. Image below is for IC, but the concept is the same.
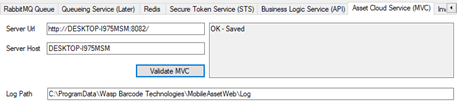
- Save.
- On the Rendering Service tab, update the log path.
- Save and exit the configuration tool.
Start the Web Sites
And finally, the moment of truth.
- Stop the websites from the previous configuration.
- Close any browsers to Wasp services.
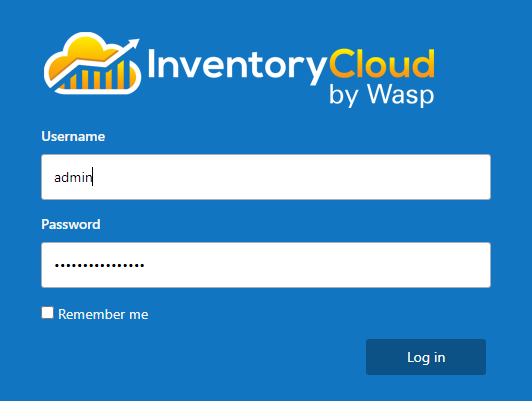
- Start each website in turn, WaspSTS, WaspAPI, and then WaspSTS.
- Browse each site to verify operation. Note that the images are from moving IC.

You may get an activation screen instead of the log in.
Trouble Shooting if Site Fails
If your AC fails to come up properly, try these remediation steps
- Check paths
- Change bindings host name parameter to machine name (or to localhost)
- Did you remember to recycle the application pools in IIS?
- Did you remember to flush the Redis cache?
- Did you check the dbo_Reader and dbo_Writer SQL Login accounts and passwords?
Activate AssetCloud On-Prem
If your AC wants you to (re)activate, use your activation license or obtain a new one, activate, then log in!
IC example used since testing with AC did not require reactivation.
Prepare for Future Upgrades
Update the paths in the registry for Wasp Barcode in order to assist in future upgrades work correctly.
Registry Hive Subkey & Values
Adjust the following values in the registry using RegEdit to show the new path locations.
\HKEY_LOCAL_MACHINE\SOFTWARE\Wasp Barcode Technologies\Cloud
The table uses the sample paths from the move procedure above. Use the paths appropriate for how you moved the folders.
| Value | Data |
|---|---|
| IISRoot | E:\wwwroot |
| WaspAPI_DirPath | E:\wwwroot\WaspAPI |
| WaspSTS_DirPath | E:\wwwroot\WaspSTS |
Conclusion
This concludes how to move your Wasp AC (or IC) off the system drive.