

Trouble with 2023 timeclocks (models BC150, RF250, HD350, B3000) connecting to PreciseTime (usually due to the customer's DHCP server not supplying the DNS server's IP address):
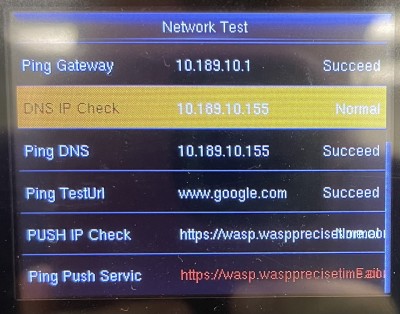
A. Navigate to the clock's Network Test configuration screen. In the instructions below, the directions are for the arrow keys. Example of what we're looking for:
- M button
- authenticate as admin if necessary
- go to Autotest: down, down, down, right, M
- go to Network Test: down, down, down, down, M
- go to Ping DNS: up, up, up, up
- If corresponding via email, take a photo of this screen and attach it to a reply to the support email.
B. Examine the results of the network test, focusing on a couple of lines:
Ping DNS [ip address] (Succeed or Fail)
Ping TestUrl www.google.com (Succeed or Fail)
If the DNS IP address line is red, the DNS IP is not being supplied by the customer's DHCP server, and must be manually entered into the clock (procedure below).
If the Ping TestUrl line is red, the clock is not communicating to the internet (including the PreciseTime cloud server).
C. Determine the network's DNS server's IP address:
- Start a command prompt: Start, Run (or Windows key + R on the keyboard)
- Type cmd then Enter key
- In the command prompt window, type the following (including the space after ipconfig) then Enter:
ipconfig /all- If there are many lines of input, scroll up to the first adapter section.
- Look for a line starting with DNS Servers.
- Mark down the IP address on that line, for example 192.168.1.20
D. Enter the DNS server's IP address into the clock settings. On the clock:
- M button
- Authenticate if necessary.
- COMM: right, right, M
- Ethernet: M
- DNS: down, down, down, M
- Enter the DNS IP address values. Use the down arrow to move to the next byte (or up arrow for previous).
- When done entering the address, down arrow so Confirm is selected in Yellow, then M.
- ESC, ESC, ESC until you're back at the clock screen.
- Remove the power cord from the clock, wait 10 seconds, then replace the power cord.
- Confirm the internet connectivity via the Network Test (as described in Part A above) where the Ping TestUrl to google.com should now show Normal.
On the PC, PreciseTime should now show the clock as Active, and the employees should shows as On Clock.