Symptom: Windows assigns the pole display a port numbered higher than 10, and when you try to change it, all of the lower ports show (in use), so you can't select them.
Cause: When a device that uses a com port is disconnected, Windows holds that com port in reserve so that when the device is reconnected, your software won't have to be reconfigured to use a new com port each time. But if the device is connected to a different USB port, Windows recognizes it as being a different device, so it is not allowed to use the same com port. This leads to devices having multiple ports in reserve, filling up the list.
Resolution:
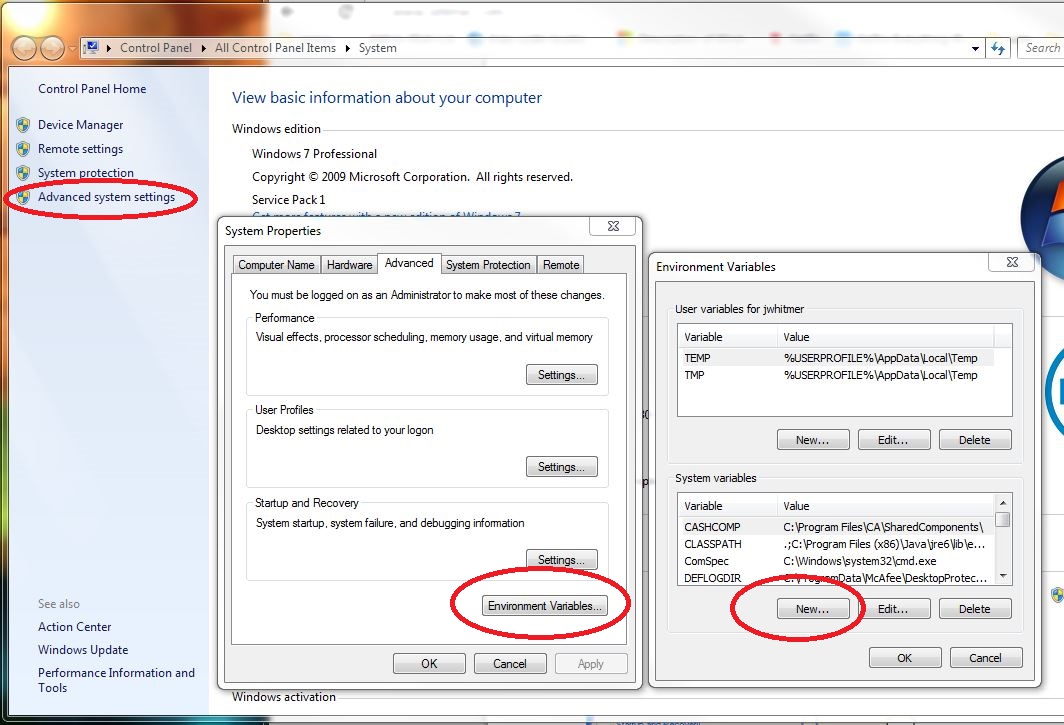
1. From the desktop or the Start Menu, right click My Computer and go to Properties.
2. In the System Properties window, go to the Advanced tab, or click the Advanced System Settings link on the left, depending on your version of Windows.
3. Click Environment Variables. In the Environment Variables window, under System variables, click New.

4. In the New System Variable window, enter DEVMGR_SHOW_NONPRESENT_DEVICES for the Variable Name, and 1 for the Variable Value, then click OK twice.
5. Go to Device Manager. In the View menu, click Show Hidden Devices.
6. Expand the Ports (COM & LPT) category. It will now show all of the ports currently in use in normal color, and also all ports that are reserved but not currently connected in dimmed colors. If you see the same device listed multiple times on different ports, you can remove the extras. The highest numbered port for each device is the most recent, and will usually be the one in full color. Right click on the lower numbered ports and select Uninstall to remove them. After each is uninstalled, the list will refresh. Continue until all the duplicates are removed, and also remove any other devices you no longer need. Note that if you accidentally remove the wrong device, you will need to reinstall the driver for it before using it again.
7. Once you have opened at least one port between 5 and 9, right click on the port for the pole display and go to Properties. On the Port Settings tab, click Advanced. On the Com Port Number drop down list, select a port between 5 and 9 that is not showing as (in use). Click OK and close all of the open windows.
8. Open QuickStore and go to Setup > This Computer > 3. Pole Display. Check the box for "A customer pole display is connected to this computer", and select the com port number from step 7. When you click OK, the display should start showing the messages you have in the Scrolling Message and Flashing Message boxes, and is now ready to use.
Rate the quality of this page
26 of 47 people found this page helpful


