


This article applies to models WDT3200, WDT3250, WDT3200-II, WDT3250-II.
Will not power on at all (no sounds or faint image on screen):
- Will it power on with the charging cable connected? It should power on even if there is no battery installed, or if the battery has been installed at the wrong orientation.
- If the battery has been installed at the wrong orientation, it will not power the device. The battery label is marked This Side Up, and has an arrow pointing to the end to insert first.
- If not using the charging cable, is the battery charged?
- The battery lid must be in place for the device to turn on.
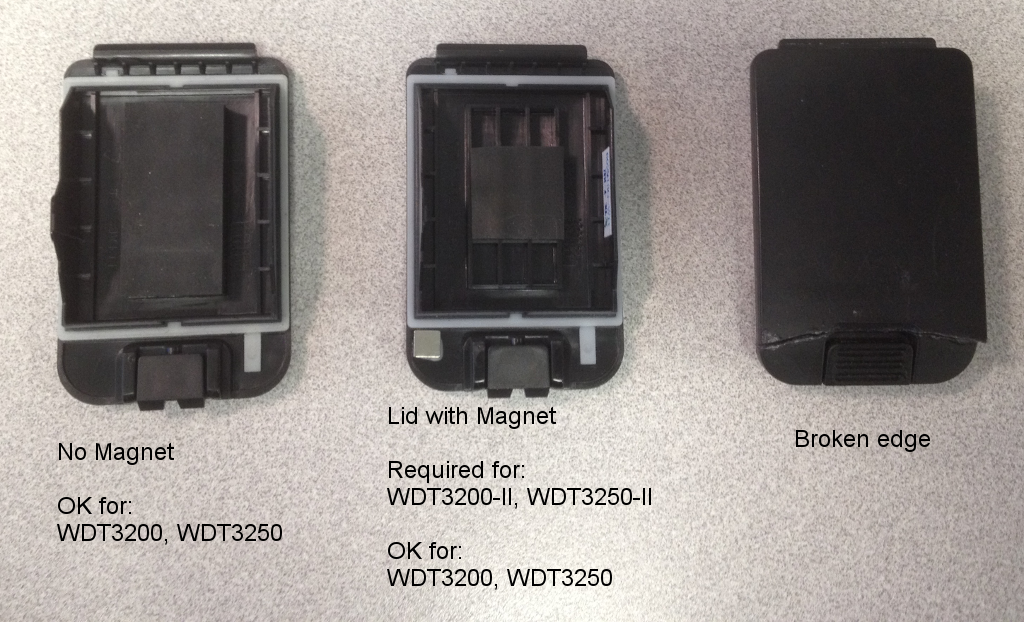
- The earlier models not ending in -II (WDT3200 & WDT3250) have a switch in the battery compartment that is actuated by the tab on the side of the battery lid. If the lid bends due to cracks, or isn't firmly in place, the switch will not actuate and the unit will not turn on.
- The later models ending in -II (WDT3200-II & WDT3250-II) don't have the physical switch, but they require a magnet in the lid for the unit to turn on. So if the magnet has fallen out (was the unit dropped?), or if the user has switched a lid from a non-II model, those won't work. If the lid is cracked at the edge, the magnet may not actuate the sensor.
- This picture shows battery lids with and without magnet, and a cracked lid.
- When performing the hardware cold boot (battery pull, switch), make sure the charging cable has been removed, so that all sources of power to the device have been removed: main battery, backup battery, and AC power.
Screen is dark, but unit makes sounds when booted as if it's responding normally:
Screen brightness/backlight for WDT3200/WDT3250:
The F key is at the upper right corner of the keypad, under the ENT key. Operation: Press & hold F, then press & release the appropriate arrow key(s) as needed, then release F.
F+Up Arrow: turns backlight off & on.
F+Left or Right Arrow: dims or brightens screen. These affect the brightness level even if the backlight has been turned off with F+Up Arrow, so the next time you turn on the backlight, the new brightness level will be used.
Reset Procedures
Warm Boot (software): Lose all unsaved/uncommitted data! will not erase software:
Start, Programs, Utilities, BootMode, Warm Boot button (happens instantly, no confirmation).
Warm Boot (hardware): Lose all unsaved/uncommitted data! will not erase software:
Paperclip in reset hole on front, under keypad (looks like microphone hole)
Cold Boot (software): Lose all data in RAM (data, programs):
Start, Programs, Utilities, BootMode, Cold Boot button, Yes to confirm.
Cold Boot (hardware): Lose all data in RAM (data, program)
Remove main battery, turn off backup battery switch, wait 10 seconds, turn switch back on, insert main battery, restart.
Clean Boot (available on WDT3200-II & WDT3250-II): Lose all data in RAM (data, program), reload OS
Start, Programs, Utilities, BootMode, Clean Boot, Yes to confirm.
Scanning beam is not emitted when Trigger/Scan button is pressed:
Start button, Settings, Control Panel, Scanner. Click onto Test tab: If the laser is working, it should always send a beam when the button/trigger is activated while on the Test tab. Go to next tab "To Kpd", put a check in Start Scan2Key When Exit, then tap OK in upper right. Test in your desired application.
Start menu, Settings, Control Panel, Scanner. Expand Scanning Options, Scanning Mode: double-click to change to Trigger. Apply or OK to set change, then try again.
Hi,
If those don't work, try warm boot. If that doesn't work, try cold boot.
When enabling Scan2Key, if there is an error that the scanner port is occupied by another application, Warm Boot via reset button.
If the device is not recognizing stylus taps in the correct place on screen, recalibrate the screen:
1. Key Sequence: Green F key+ESC at the same time
or
2. Start, Settings, Control Panel, Stylus. Calibration tab, Recalibrate button.
Will only boot to a solid blue screen, or to a blue splash screen with "WDT3200", Wasp logo, "Reading OS"
If warm and cold boots don't fix the problem, try this procedure:
- Remove the main battery and unplug the power/data cable (or remove from charging cradle) so there is no power to the device.
- In the battery compartment there is a small switch.
a. If it's set to On, change it to Off for 10 seconds, then back to On.
b. If it's set to Off, change it to On. - Let the scanner sit overnight (8-10 hours). This will drain the backup battery.
- Set the small switch to Off for 10 seconds, then back to On.
- Replace the main battery and replug the power/data cable (or replace on charging cradle).
- Charge the device for several hours, then see if it will boot up.
- If the device still will not boot, there is a hardware problem and would need servicing to restore functionality.